
Step 1 - Select your Downloads or Desktop
Start by selecting your Downloads (or Desktop) folder as the input location. This is usually the messiest folder on your system, which makes it the best place to start. You do not need to prepare anything in advance - AI File Sorter is designed to handle mixed and unstructured files.

Step 2 - Choose what to analyze
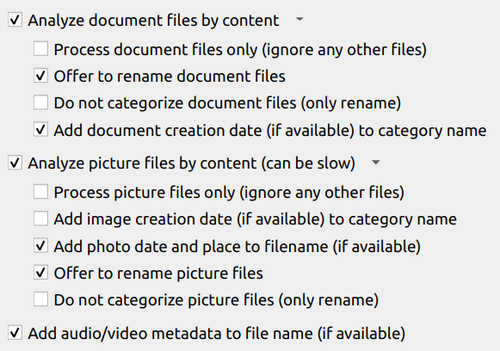
For a typical Downloads folder, it is recommended to enable:
- image analysis
- document analysis
- audio/video metadata
- categorization
This allows the app to understand both content and context.
For example:
- images can be renamed based on what they contain
- documents can be categorized based on their actual text
- audio and video files can be named according to their metadata (if they contain it)
- files can be grouped into meaningful folders
If you only want to start small, you can begin with categorization only.
Step 3 - Run a first pass (dry run)
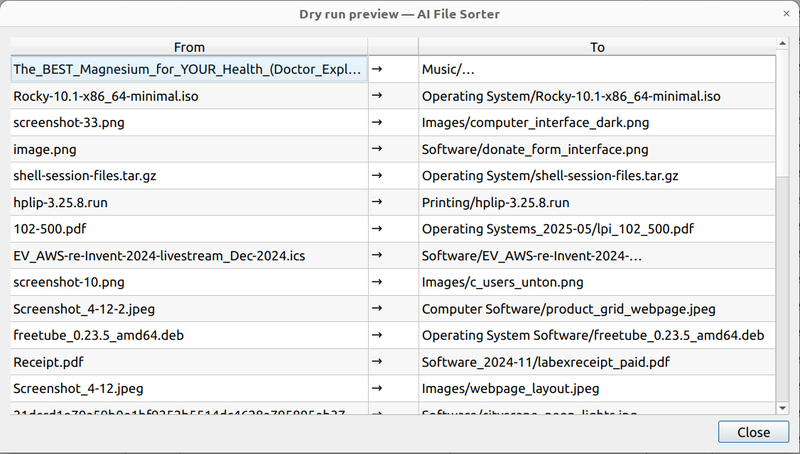
Before applying any changes, run a full scan and review the results.
The preview shows:
- proposed categories
- suggested file names
- planned moves (from → to)
This step is important. It gives you a clear overview of what will happen without modifying anything yet.
Step 4 - Review and adjust
Go through the suggestions and make adjustments where needed.
Typical things to check:
- file names that can be simplified
- categories that should be merged
- edge cases (temporary files, duplicates, unclear items)
You can edit names directly in the review dialog and selectively apply or skip changes.
Step 5 - Apply changes
Once satisfied, apply the changes.
AI File Sorter will:
- create folders automatically
- move files into categories
- rename files where applicable
All operations happen only after confirmation.
If needed, you can undo the entire run afterward.
Step 6 - Optional: enforce structure with whitelists
If you want stronger consistency, you can define a whitelist.
This is especially useful if:
- you want a fixed set of categories (e.g. Documents, Images, Software, Archives)
- you want to avoid slight variations in naming
- you are organizing repeatedly over time
Whitelists ensure that all files are categorized within a predefined structure.
Step 7 - Make it a habit (quick maintenance runs)
Once your Downloads folder is clean, maintenance becomes easy.
Instead of letting it grow again:
- run AI File Sorter periodically (e.g. once a week)
- process only recent files
- apply changes in small batches
This keeps the folder under control with minimal effort.
What you gain
After cleanup:
- files are easier to find
- names are consistent and meaningful
- folders reflect actual content
- clutter is reduced significantly
More importantly, the folder stops growing into chaos again.
Related
If you want more control over how files are categorized, see how to customize your categories using whitelists.
A detailed case study on organizing large photo collections will also show how these ideas scale to thousands of files.
Comments (0)
No comments yet.
Log in to add a comment.